智能机器人(46):目标识别
ORK(Object Recognition Kitchen)是一套以template matching方法为主的目标识别工具,把看到的物体跟资料库中的物体比对,够相似,就算辨识成功。
ORK, based on OpenCV+PCL。OpenCV’s purpose is to help turn “seeing” into perception. We will also use active depth sensing to “cheat”
ORK, was built on top of ecto which is a lightweight hybrid C++/Python framework for organizing computations as directed acyclic graphs.
There is currently no unique method to perform object recognition. Objects can be textured, non textured, transparent, articulated, etc. For this reason, the Object Recognition Kitchen was designed to easily develop and run simultaneously several object recognition techniques. In short, ORK takes care of all the non-vision aspects of the problem for you (database management, inputs/outputs handling, robot/ROS integration …) and eases reuse of code.
REF: http://www.ais.uni-bonn.de/~holz/spme/talks/01_Bradski_SemanticPerception_2011.pdf
1. ORK安装
1.1 预安装ORK依赖
$ export DISTRO=indigo
$ sudo apt-get install libopenni-dev ros-${DISTRO}-catkin ros-${DISTRO}-ecto* ros-${DISTRO}-opencv-candidate ros-${DISTRO}-moveit-msgs
maybe only need tihs ros-${DISTRO}-opencv-candidate.
1.2. 安装ORK包
install all about ork:
$ sudo apt-get install ros-indigo-object-recognition-*
or,
$ sudo apt-get install ros-indigo-object-recognition-core ros-indigo-object-recognition-linemod ros-indigo-object-recognition-msgs ros-indigo-object-recognition-renderer ros-indigo-object-recognition-ros ros-indigo-object-recognition-ros-visualization
3. CouchDb数据库
In ORK everything is stored in a database: objects, models, training data. 对象、模型、训练数据。
Couchdb from Apache is our main database and it is the most tested implementation. To set up local instance, what you must do is install couchdb, and ensure that the service has started.
3.1 先安装CouchDB工具
$ sudo apt-get install couchdb
检查是否安装成功
$ curl -X GET http://localhost:5984
如果成功的话:
— {“couchdb”:”Welcome”,”version”:”1.0.1″}
3.2 数据可视化的Web接口
We have a set of webpages that may be pushed to your couchdb instance that help browse the objects that you training or models created.
a) First installed couch-app
$ sudo apt-get install python-pip
$ sudo pip install -U couchapp
数据库中可视化数据。
We provide a utility that automatically installs the visualizer on the DB. This will upload the contents of the directory to collection in your couchdb instance, called or_web_ui.
$ rosrun object_recognition_core push.sh
After this you can browse the web ui using the url:
http://localhost:5984/or_web_ui/_design/viewer/index.html
now, is empty.
5. TOD 的 Quickstart
ORK比较像一个框架,包含了好几种演算法,其中一种是TOD。
$ roscore
$ roslaunch openni_launch openni.launch
5.1 设置工作区。 Setup capture workspace
$ rosrun object_recognition_capture orb_template -o my_textured_plane
保持平面正视,图像居于中心。 ‘s’保存图像,例如上面的 my_textured_plane。 ‘q’退出。
可以跟踪下,以查看是否合格的模板。
$ rosrun object_recognition_capture orb_track –track_directory my_textured_plane
NOTE:
Use the SXGA (roughly 1 megapixel) mode of your openni device if possible.
$ rosrun dynamic_reconfigure dynparam set /camera/driver image_mode 1
$ rosrun dynamic_reconfigure dynparam se t /camera/driver depth_registration True
5.2 获取目标。 Capture objects
Once you are happy with the workspace tracking, its time to capure an object.
a) 预览模式。 Place an object at the origin of the workspace. An run the capture program in preview mode. Make sure the mask and pose are being picked up.
$ rosrun object_recognition_capture capture -i my_textured_plane –seg_z_min 0.01 -o silk.bag –preview
b) 正式模式。 When satisified by the preview mode, run it for real. The following will capture a bag of 60 views where each view is normally distributed on the view sphere. The mask and pose displays should only refresh when a novel view is captured. The program will finish when 35 (-n) views are captured. Press ‘q’ to quit early.
$ rosrun object_recognition_capture capture -i my_textured_plane –seg_z_min 0.01 -o silk.bag
c) 数据上传到DB。 Now time for upload. Make sure you install couch db on your machine. Give the object a name and useful tags seperated by a space, e.g. ‘milk soy silk’.
$ rosrun object_recognition_capture upload -i silk.bag -n ‘Silk’ milk soy silk –commit
5.3 训练对象。 Train objects
Repeat the steps above for the objects you would like to recognize. Once you have captured and uploaded all of the data, it time to mesh and train object recognition.
a) 生成mesh。 Meshing objects can be done in a batch mode as follows:
$ rosrun object_recognition_reconstruction mesh_object –all –visualize –commit
b) 查看。 The currently stored models are on:
http://localhost:5984/or_web_ui/_design/viewer/meshes.html
c) 训练。 Next objects should be trained. It may take some time between objects, this is normal. Also, here assumes that you are using TOD which only works for textured objects. Please refer to the documentation of other methods.
$rosrun object_recognition_core training -c `rospack find object_recognition_tod`/conf/training.ork –visualize
5.4 检测对象。 Detect objects
Now we’re ready for detection.
First launch rviz, it should be subscribed to the right markers for recognition results. /markers is used for the results, and it is a marker array.
rosrun object_recognition_core detection -c `rospack find object_recognition_tod` /conf/detection.ros.ork –visualize
7. Linemod 的 Tutorials
ORK比较像一个框架,包含了好几种演算法,其中一种Linemod。 Linemod is a pipeline that implements one of the best methods for generic rigid object recognition and it proceeds using very fast template matching.
REF: http://ar.in.tum.de/Main/StefanHinterstoisser.
这里练习:
1)将一个对象的mesh添加到DB中;
2)学习如何手动添加对象到DB中;
3)ORK数据库中数据的可视化。
7.1 添加目标obj。 Creating an object in the DB
ORK主要是识别对象的,首先需要将对象存储在DB中。像ORK 3d capture这样的管道可以用来创建对象。但是也要从内核(core)中用脚本对其进行处理。
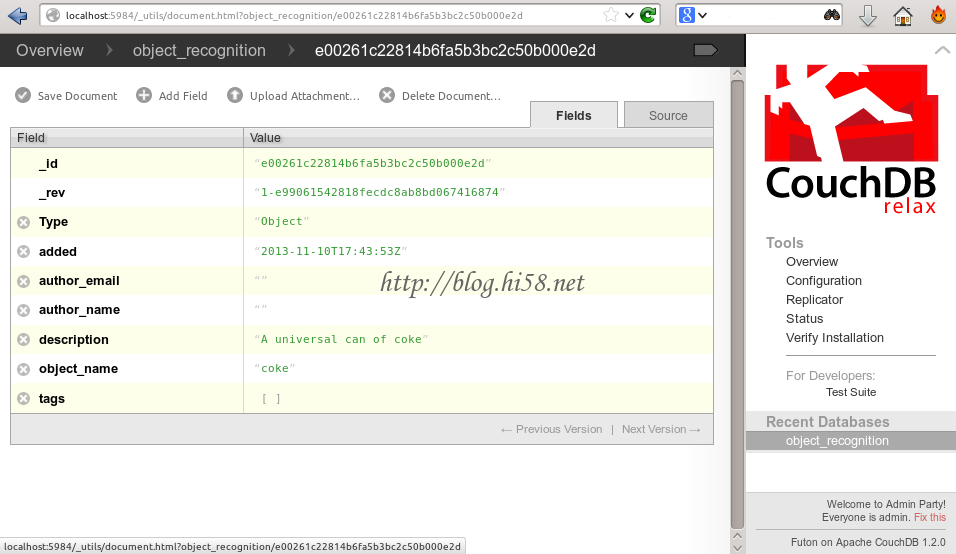
$ rosrun object_recognition_core object_add.py -n “coke ” -d “A universal can of coke” –commit
— Stored new object with id: 9633ca8fc57f2e3dad8726f68a000326
执行上面这个指令之后,就可以从查看自己的资料库里是否已经新增这个物体:
http://localhost:5984/_utils/database.html?object_recognition/_design/objects/_view/by_object_name
点击对象,可以看到对象的信息,尤其是对象的id,DB的每个元素都有其自己的哈希表作为唯一ID(防止你给不同的对象相同的命名)。记住这个ID 9633ca8fc57f2e3dad8726f68a000326 :

7.2 添加模型mesh。 adding a mesh for the object
首先需要用DB接口获取了正确的对象id。
这里先获取一个例子中的模型mesh。When you install ORK, the database is empty. Luckily, ORK tutorials comes with a 3D mesh of a coke that can be downloaded here:
接下来要指定这个目标的3D模型, 在ork_tutorials这个例程里有coke.stl 档,就是可乐罐的3D模型。先下载这个例程,并且编译:
$ git clone https://github.com/wg-perception/ork_tutorials
$ cd ..
注意编译。 $ cd ..
$ catkin_make
NOTICE:下面这个指令中那串像乱码的内容就是object 的ID ,这串内容要从上一步自己的资料库里才能查得到。
You can upload the object and its mesh to the database with the scripts from the core:
$ rosrun object_recognition_core mesh_add.py 9633ca8fc57f2e3dad8726f68a000326 /home/dehaou1404/catkin_ws/src/ork_tutorials/data/coke.stl –commit
— Stored mesh for object id : 9633ca8fc57f2e3dad8726f68a000326
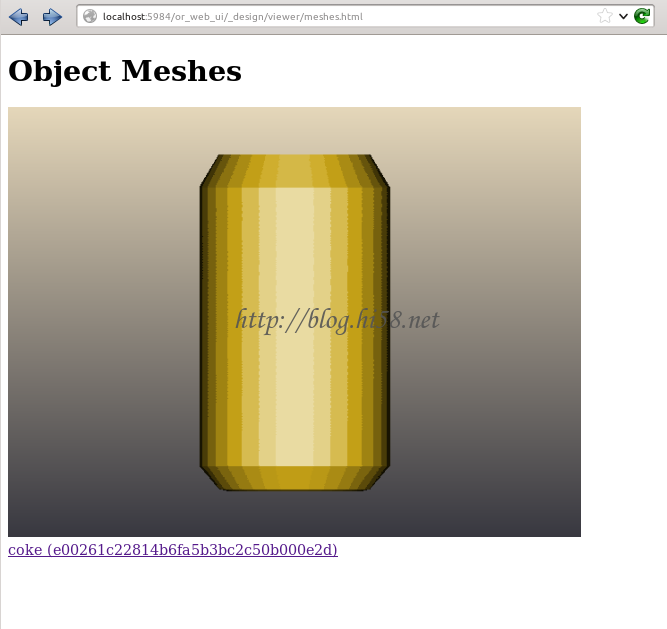
7.3 可视化数据。 Visualizing the object
Now, if you want to visualize the object in the db, you can just go to the visualization URL:
http://localhost:5984/or_web_ui/_design/viewer/meshes.html
you should see the following:

7.4 howto Delete the object
$ rosrun object_recognition_core object_delete.py OBJECT_ID
7.5 学习
Now, you can learn objects models from the database.
Execute the Linemod in the training mode with the configuration file through the -c option. The configuration file should define a pipeline that reads data from the database and computes objects models.
$ rosrun object_recognition_core training -c `rospack find object_recognition_linemod`/conf/training.ork
这个training指令会利用资料库里的3D 模型建立辨识时所需要的template,如果执行成功,你会看到如下的讯息
Training 1 objects.
computing object_id: 9633ca8fc57f2e3dad8726f68a000326
Info, T0: Load /tmp/fileeW7jSB.stl
Info, T0: Found a matching importer for this file format
Info, T0: Import root directory is ‘/tmp/’
Info, T0: Entering post processing pipeline
Info, T0: Points: 0, Lines: 0, Triangles: 1, Polygons: 0 (Meshes, X = removed)
Error, T0: FindInvalidDataProcess fails on mesh normals: Found zero-length vector
Info, T0: FindInvalidDataProcess finished. Found issues …
Info, T0: GenVertexNormalsProcess finished. Vertex normals have been calculated
Error, T0: Failed to compute tangents; need UV data in channel0
Info, T0: JoinVerticesProcess finished | Verts in: 1536 out: 258 | ~83.2%
Info, T0: Cache relevant are 1 meshes (512 faces). Average output ACMR is 0.669922
Info, T0: Leaving post processing pipeline
7.4 识别
Once learned, objects can be detected from the input point cloud. In order to detect object continuously, execute the Linemod in the detection mode with the configuration file that defines a source, a sink, and a pipeline
REF: http://wg-perception.github.io/object_recognition_core/detection/detection.html
$ roslaunch openni_launch openni.launch
$ rosrun dynamic_reconfigure dynparam set /camera/driver depth_registration True
$ rosrun dynamic_reconfigure dynparam set /camera/driver image_mode 2
$ rosrun dynamic_reconfigure dynparam set /camera/driver depth_mode 2
$ rosrun topic_tools relay /camera/depth_registered/image_raw /camera/depth_registered/image
$ rosrun object_recognition_core detection -c `rospack find object_recognition_linemod`/conf/detection.ros.ork
^^^ igoned
7.5 Visualization with RViz
a) config rviz
$ roslaunch openni_launch openni.launch
$ rosrun rviz rviz
Set the Fixed Frame (in Global Options, Displays window) to /camera_depth_optical_frame.
Add a PointCloud2 display and set the topic to /camera/depth/points. This is the unregistered point cloud in the frame of the depth (IR) camera and it is not matched with the RGB camera images. For visualization of the registered point cloud, the depth data could be aligned with the RGB data. To do it, launch the dynamic reconfigure GUI:
$ rosrun rqt_reconfigure rqt_reconfigure
Select /camera/driver from the drop-down menu and enable the depth_registration checkbox. In RViz, change the PointCloud2 topic to /camera/depth_registered/points and set the Color Transformer to RGB8 to see both color and 3D point cloud of your scene.
REF: https://wg-perception.github.io/ork_tutorials/tutorial03/tutorial.html
b) 然后就可以用Rviz查看识别的目标。
Go to RViz and add the OrkObject in the Displays window.
Select the OrkObject topic and the parameters to display: id / name / confidence.
Here, we show an example of detecting two objects (a coke and a head of NAO) and the outcome visualized in RViz.
For each recognized object, you can visualize its point cloud and also a point cloud of the matching object from the database. For this, compile the package with the CMake option -DLINEMOD_VIZ_PCD=ON. Once an object is recognized, its point cloud from the sensor 3D data is visualized as shown in the following image (check blue color). The cloud is published under the /real_icpin_ref topic.
For the same recognized object, we can visualize the point cloud of the matching object from the database as shown in the following image (check yellow color). The point cloud is created from the mesh stored in the database by visualizing at a pose returned by Linemod and refined by ICP. The cloud is published under the /real_icpin_model topic.
REF: http://wg-perception.github.io/ork_tutorials/tutorial03/tutorial.html
11. 算法简介
这个Linemod算法的核心概念就是整合多种不同的modalities,把modality想成物体的不同特征可能比较好理解,
例如下图中就有两种modalities – gradient 跟surface normal,而因为这两种特征所表达的特性不一样,所以可以互补,进而达到更好的辨识效果。

所以说,Linemod 需要先有已知的物体模型,然后先取得这个物体各种modlaities 的template,这样在辨识的时候就可以拿template 来比对了。
REF: http://blog.techbridge.cc/2016/05/14/ros-object-recognition-kitchen/
REF:http://wenku.baidu.com/link?url=hK1FMB2yR_frGcLxmQKAiZYhgKJdt0LBpaK1Sy-dY0ZgXuR2_jnLDYDBlaIz9eSLyvWOd66fVv-t3kH6NVapF2at3Cv9P1DfoxIyAn3MAuG


发表评论
Want to join the discussion?Feel free to contribute!