Using Raspberry Pi 3 B
缘起:
开源硬件是大势所趋,尤其是嵌入式, 所以RPi出来了。
RPi的初衷是推广科技,尤其是鼓舞下一代成为熟悉计算机的人才。树莓派基金会计划书上写“要让孩子们喜欢上编程。” 。
具体到版本Raspberry Pi 3 Model B,在中国大家叫树莓派3代B型, 简称为RPi3 B。
RPi3 B兼容1代B+和2代B, 是全球受欢迎的mini PC。
配置: 64位1.2GHz四核ARM V8 Cortex-A53, 1GB内存, 10/100自适应网卡, 802.11n WiFi和蓝牙4.1,HDMI接口, USB 2.0接口 x 4, MicroSD 卡插槽, 3.5 mm 音频输出接口, 40PIN GPIO接口, CSI摄像头接口, DSI显示接口, MicroUSB 供电(须用2.5A以上电源 : 输出5V & >700mA(通常选择1A或2A)的USB电源适配器)。
应用:
这个单计算机板很适合物联网 (IoT)设计。
不仅能跑全系列ARM GNU/Linux发行版而且支持Snappy Ubuntu Core及Windows 10。
GPU支持OpenGL ES 2.0、硬件加速的OpenVG,和高至1080p30fps的H.264硬件解码。
GPU的通常计算能力达到1Gpixel/s, 1.5Gtexel/s 或 24 GFLOPs,并且提供一系列材质渲染过滤与DMA功能。
相比较来看,树莓派的图形性能基本上与初代Xbox等同。
1. 准备SD卡
如果不插Micro SD卡,树莓派pi是无法启动的,系统引导必须使用Micro SD卡。
不过,可以指定在引导之后从USB硬盘里面读取操作系统来接管启动过程,但是最常见的还是直接使用Micro SD卡代替树莓派的硬盘,操作系统装到SD卡上。
推荐这个TF 卡 – Sandisk 16G Extreme ,标称80, 但是估计读写速度也就 20M/s。
3. 下载系统
树莓派使用Debian 或者 Linux ARM都可以。
Debian Jessie 完全支持树莓派的硬件,还有功能强大的包管理器,可以安装更多软件。
Linux ARM是一个极简操作系统,适合熟悉Linux系统的人, 想把树莓派当服务器的话不错。
官方首推使用NOOBS和raspbian。
NOOBS自身并不是操作系统,而是树莓派官方推荐的启动管理软件,通过NOOBS可以免镜像刷写工具安装系统,并可以不拔卡在树莓派上直接重装系统。NOOBS和Raspbian都提供了完整版和Lite版两种方式。
NOOBS的完整版包含了Raspbian,可以离线安装raspbian,Lite版仅有一个系统安装程序,需要连接网络才能安装具体的操作系统。
Raspbian的完整版是一个完整的桌面镜像,而Lite版预装的软件包要少一些(联网后继续安装)。
The Raspbian with PIXEL image comes pre-installed with plenty of software for education, programming and general use. It has Python, Scratch, Sonic Pi, Java, Mathematica and more. we get Minimal image based on Debian Raspbian Jessie.
https://www.raspberrypi.org/downloads/,
https://www.raspberrypi.org/downloads/raspbian/
一般都是用官方版本的系統。
不过也没关系,反正MicroSD卡也沒多少,多备几张,每张配一个不同的系统。
这里 : 不用NOOBS,
下载最简单的rasbian Lite,
2017-03-02-raspbian-jessie-lite.zip。
5. 烧录SD卡
所谓安装系统,其实是下载系统镜像到Micro SD卡。
$ unzip 2017-03-02-raspbian-jessie-lite.zip
解压得到2017-03-02-raspbian-jessie-lite.img 大概 1.3G.
5.1 Ubuntu 系统
插入SD card, 查看 SD卡序号
$ df -h
SD card will be listed as something like /dev/mmcblk0p1 or /dev/sdX1,
可见MicroSD 卡是 /dev/sdc <— 卸载 MicroSD 卡上的所有分区 you need to unmount it so that files can’t be read or written to the SD card while you are copying over the SD image. sudo umount /dev/sdc1 sudo umount /dev/sdc2 写入 img 文件 sudo dd bs=1M if=2017-03-02-raspbian-jessie-lite.zip of=/dev/sdc sudo dd bs=4M if=2017-03-02-raspbian-jessie-lite.zip of=/dev/sdX replace the input file if= argument with the path to your .img file replace the /dev/sdX in the output file of= argument with the correct device name Make sure the device name is the name of the whole SD card as described above, not just a partition of it. block size set to 4M will work most of the time. If not, please try 1M, although this will take considerably longer. it could take more than five minutes to finish writing to the card, To see the progress of the copy operation, you can run the dd command with the status option sudo dd bs=4M if=2017-03-02-raspbian-jessie.img of=/dev/sdd status=progress But older version of dd, the status option may not be available. 5.2 Windows系统 注意笔记本下的ubuntu系统, 由于驱动问题, 对于大部分内置sd读卡器是不支持的。所以: 1. ubuntu下使用usb外置读卡器, 2. 到windows下面使用Win32 Disk Imager 。 5.3 安装完成后 TF卡被分成两个分区: 67MB vfat格式的引导分区,系统启动后被挂载在/boot目录, 和, TF卡剩余空间 ext4格式的磁盘分区 6. 没有显示器的话 没有HDMI 显示器也能够连接到树莓派, 一共有四种方法: * 串口终端操作 * 局域网 * PC直连 * 手机USB网络共享 后面方法都是ssh方式。 树莓派早期是默认开机启动 SSH 。 6.1 串口连接树莓派 树莓派用到的引脚为1(3.3V)、39(GND)、14(TXD)、15(RXD)。 新建一个Serial连接:115200、8 Data bits、no Parity、1 stop bit。 打开创建的连接 树莓派上电即可看到树莓派启动的输出信息。
6.3 局域网
注意电脑或者手机的IP地址必须和树莓派的IP地址在同一网段内。 ssh登陆树莓派只要能够知道树莓派的IP地址就可以了, 如果有路由器权限,直接查看rasp的地址即可。 大多数是没这个权限,所以需要网络扫描网络出raspi的地址。
WIndows下, 用PortScan 或者 Advanced IP Scanner 。 Linux下,用Nmap的 -sP参数网络扫描网络全部网段的活动机器:
$ nmap -sL 192.168.43.1/24 or
$ nmap -sP 192.168.43.123-234 or
$ sudo nmap -sP -PI -PT 192.168.1.0/24
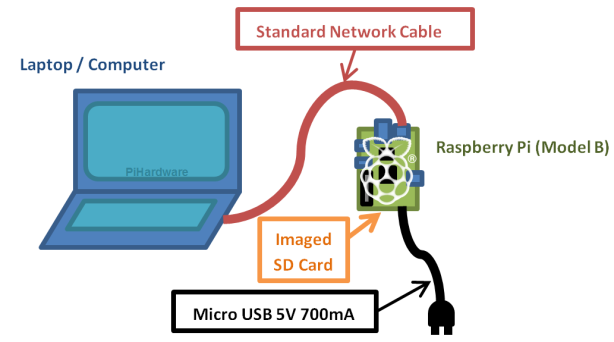
6.5 PC直连 直接用网线电脑的以太网口与树莓派的网口相连。 不经过路由器,用最少的工具,方式这样: 
在把sd卡装到raspi上之前,需要通过修改启动参数为pi预分配一个IP地址。
找到Micro sd卡 上的 cmdline.txt文件。
vi cmdline.txt
如果是windows下修改cmdline.txt, 使用Notepad++。
在最末尾加上:
ip=192.168.1.22
这样,pi上电启动后,会为它的网口分配192.168.1.22 。
把读卡器从PC上取下装到raspi上,用普通网线将raspi的网口和PC的网口连接起来,就可以开机了。
从PC端ping一下Pi3, 测试okay。
ping 192.168.1.22
但是Pi3默认的是关闭SSH服务, 所以还是需要显示器开机。
7. 连接显示器
树莓派无开关键,所以接入电源即为开机。
7.1 配置raspi-config
$ sudo raspi-config
选择expand_rootfs把整个系统的可用空间扩展到储存卡的大小。 因为Raspbian写入TF卡后,根分区不会使用剩余的TF卡空间,造成空间浪费。
raspi默认的是英国GB键盘布局,有些键打不出,而我们默认用的是US布局。
选择最常见的General 101 PC 键盘布局, layout要用US, alternative international。
默认的是关闭了SSH 和 VNC, 也一并开启。
OKay, raspi-config结束,重启。
7.3 配置网络
$ sudo vim /etc/network/interfaces
若不使用树莓派的有线网口连接网络的话,最好把 /etc/network/interfaces 文件第一行中 auto lo eth0 wlan0 的 eth0 删掉。
因为它会导致树莓派开机时等待有线网卡 动态分配IP,但实际上有线网口并没有连接到路由器,这里会让内核等待更长的时间,从而拖慢开机速度。
但是要注意,删掉 eth0 的话就意味着无法通过网线连接路由器了,要想连接就必须重新加上 eth0 。
这样:
auto lo eth0 wlan0 wlan1
iface lo inet loopback
iface eth0 inet dhcp
allow-hotplug wlan0 wlan1
iface wlan0 inet dhcp
wpa-conf /etc/wpa_supplicant/wpa_supplicant.conf
iface wlan1 inet manual
pre-up which owifi
up owifi start
down owifi stop
——
如果需要让pi连接路由器,并自动获取IP,需要将启动参数上的固定ip删除 :
vi cmdline.txt,
去掉最末尾的 ip=172.20.10.9
如果需要设置静态IP :
sudo nano /etc/network/interfaces
改 static
在iface之后 添加 address netmask gateway dns-nameservers信息。
手动重启网络
sudo /etc/init.d/networking restart #重新加载网络配置文件
sudo ifup eth0 # 启动网卡eth0
7.5 配置wifi
显示周围所有的无线网络
$ sudo iwlist wlan0 scan
ESSID为无线网络名,找到自己想连接的那个网络
$ sudo nano /etc/wpa_supplicant/wpa_supplicant.conf
在文件最底部添加
network={
ssid=”网络名”
psk=”密码”
}
这样:
# 最常用的配置。WPA-PSK 加密方式。
network={
ssid=”WiFi-name1″
psk=”WiFi-password1″
priority=5
}
network={
ssid=”WiFi-name2″
psk=”WiFi-password2″
priority=4
}
priority 是指连接优先级,数字越大优先级越高(不可以是负数)。
重启树莓派后,树莓派将自动连接到WiFi。
9. 后续处理
root用户默认不允许SSH方式登陆,首次登陆用pi登陆:
ssh pi@172.20.10.9
$ passwd pi
$ sudo passwd root
启用 root 账号登录
sudo passwd –unlock root
sudo reboot
9.2 让root可以ssh
nano /etc/ssh/sshd_config
默认PermitRootLogin without-password , 改为PermitRootLogin yes
service sshd restart或者/etc/initd.d/sshd restart
9.3 更新软件源
nano /etc/apt/sources.list
用以下内容取代:
deb http://mirrors.ustc.edu.cn/raspbian/raspbian/ wheezy main non-free contrib
deb-src http://mirrors.ustc.edu.cn/raspbian/raspbian/ wheezy main non-free contrib
sudo apt-get update命令,更新软件列表。
sudo apt-get upgrade命令,更新软件。
9.5 远程桌面
Pi的系统是基于linux系统,但也可以用类似windows的图形界面来远程访问控制,比较常用的是tightvnc viewer
$ sudo apt-get install tightvncserver
CH II. 新篇
5. A static IP
Since the goal of this tutorial is to be able to work with the RPi without external keyboard or display, you want to be ssh into it. The best way is to make sure it’ll always have a static IP on your network.
$ sudo vi /etc/network/interfaces
and add the following changes:
Change iface wlan0 inet dhcp
to
iface wlan0 inet static
This changes the wlan0 interface from DHCP to static.
Add the following lines before the wpa-conf line:
address 192.168.1.155 # Static IP you want
netmask 255.255.255.0
gateway 192.168.1.1 # IP of your router
6.
# /etc/network/interfaces
auto wlan0
iface lo inet loopback
iface eth0 inet dhcp
allow-hotplug wlan0
iface wlan0 inet static
address 192.168.1.155
netmask 255.255.255.0
gateway 192.168.1.1
wpa-conf /etc/wpa_supplicant/wpa_supplicant.conf
iface default inet dhcp
# /etc/wpa_supplicant/wpa_supplicant.conf
ctrl_interface=DIR=/var/run/wpa_supplicant GROUP=netdev
update_config=1
network={
ssid=”NYO_WWWP”
psk=”topsecret”
proto=RSN
key_mgmt=WPA-PSK
pairwise=CCMP
auth_alg=OPEN
}
CH III NOTES
1. rpi用途集锦
http://wiki.ros.org/indigo/Installation/UbuntuARM
2. 为什么没有实时时钟?
树莓派没有实时时钟,关机后无法维持时钟的走时。没有连接网络的树莓派,每次开机时都需要手工设定时间。(连接网络的,开机时会自动联网获取时间)
3. Raspberry Pi vs Arduino
Arduino是一个单片机,而RPi是一台全功能的计算机,最重要区别是Arduino没有操作系统的,而树莓派是可以跑Linux等。
但是正因为树莓派软件更复杂也就让他在扩展性上更差一些,比如要接一个传感器用Arduino会很简单,而用树莓派就复杂多了。
所以Arduino类似于一个非常简化的硬件板,因为简单所以无法完成复杂的工作,树莓派非常强大适合做复杂功能的工程。
4. 工业环境中 Raspi vs Arduino
鲁棒性问题
市面上已经存在多个可用的Arduino和树莓派加固版本。像Industrial Shields公司基于Arduino的PLC和基于树莓的平板电脑的硬件已经包括了额外的鲁棒性能够满足工业需要。
协议问题
这是Arduino和树莓派的灵活性由来。在Modbus协议的基础之上制定了具体的库使两个板子之间能经由它们的协议进行通信。


发表评论
Want to join the discussion?Feel free to contribute!