Python+Qt界面设计(01)
PART – I 界面
1. 准备
2. Qt的C++界面设计
3. Qt的Python界面设计
PART – II 剥离界面代码和功能代码
1. 建立新类
2. 操作界面
PART – III 剥离主线程和任务线程
1. QThread线程
2. 线程通讯
3. 一个例子
PART – I 界面
Ubuntu系统比Windows稳定小巧免费。
OpenCV视觉项目开源免费。
Python的语言比C/Cpp效率高。
Qt界面使用简单。
SO: ubuntu+python+opencv+qt ..
整体流程是:
先用qtcreator设计界面,然后pyc转化为python界面代码,然后再单独在工作线程里应用OpenCV。
1. 准备
在Ubuntu 14.04默认给安装了Python2.7和3.4,Qt默认给安装了4.8和5.2,sip默认安装时是4.15,PyQt默认安装的是pyqt4。
qtcreator有多个版本确认使用的哪一个:
$ which qtcreator
—/usr/bin/qtcreator
确认当前使用版本:
$ qmake -version
—QMake version 3.0
—Using Qt version 5.2.1 in /usr/lib/x86_64-linux-gnu
$ qtchooser -list-versions
—4
—5
—default
—qt4-x86_64-linux-gnu
—qt4
—qt5-x86_64-linux-gnu
—qt5
$ python -V
—Python 2.7.6
$ python3 -V
—Python 3.4.3
$ sip -V
—4.15.5
—python
Python 2.7.6 (default, Jun 22 2015, 17:58:13)
>>>import sip
>>>import PyQt4
导入正常.
2. Qt的C++界面设计
Qt的C++应该是最常用的。
$ qt-creator
File–New File or project… select QT Widget Application … Choose location
例如在界面添加一个pushbutton类型的pushButton01。
然后右击pushButton01 为 clicked这个single添加一个slot, 回掉函数名字例如 CbOnClicked(),
注意!
如果是python,就不要在creator这IDE里面添加slot的回调,因为具体都在py代码中实现。
Ctrl-B to build,
Ctrl-r ro run.
总结:
QTwidgets-based-project一共4个文件:
入口文件main.cpp +mainwindow.ui文件 + mainwindow.h和mainwindow.cpp后台文件
在main.cpp -> main函数中 直接调用MainWindow类的show()方法显示主界面。
MainWindow类中有成员变量是ui,其类型是Ui::MainWindow,通过这个ui成员去访问操作界面控件
3. Qt的Python界面设计
总体是:
先用qtcreator设计界面,
然后用pyc转化为python代码。
qtcreater … File–New File or project … Applications-Qt Widgets Application … Choose … Select location
注意!
kits 选择 Qt4.8.6或5.2.1某个 … Finish
例如, 在界面添加pushbutton类型的按钮名字为pushButton01。
注意! 这里不需要在qtcreator的designer中添加slot的回调,因为具体都是在py代码中。
保存 project, ok。
界面转换成Python代码:
$ pyuic4 -x ./mainwindow.ui -o ./myGUI.py
$ nano myGUI.py
… …
self.menuBar = QtGui.QMenuBar(MainWindow)
self.menuBar.setGeometry(QtCore.QRect(0, 0, 400, 25))
self.menuBar.setObjectName(_fromUtf8(“menuBar”))
MainWindow.setMenuBar(self.menuBar)
… …
可见这个py文件储存的是ui界面信息。
以下, 是不建议的操作界面的方式。
* 在myGUI.py中直接添加回调函数:
QtCore.QObject.connect(self.pushButton01, QtCore.SIGNAL(_fromUtf8(“clicked()”)), self.CbOnClicked)
* 在myGUI.py中直接实现回调函数:
def CbOnClicked(self):
print “Hello…dehao!…”
* 整体上像这样:
$ vi myGUI.py
from PyQt4 import QtCore, QtGui
… …
class Ui_MainWindow(object):
def setupUi(self, MainWindow):
MainWindow.setObjectName(_fromUtf8(“MainWindow”))
MainWindow.resize(400, 300)
MainWindow.setStatusBar(self.statusBar)
… …
self.retranslateUi(MainWindow)
QtCore.QObject.connect(self.pushButton, QtCore.SIGNAL(_fromUtf8(“clicked()”)), self.CbOnClicked)
## … we conect your callback function here …
QtCore.QMetaObject.connectSlotsByName(MainWindow)
def retranslateUi(self, MainWindow):
MainWindow.setWindowTitle(_translate(“MainWindow”, “MainWindow”, None))
self.pushButton.setText(_translate(“MainWindow”, “PushOK”, None))
## … now realize your callback function here …
def CbOnClicked(self):
print “Hello…dehao!…”
if __name__ == “__main__”:
import sys
app = QtGui.QApplication(sys.argv)
MainWindow = QtGui.QMainWindow()
ui = Ui_MainWindow()
ui.setupUi(MainWindow)
MainWindow.show()
sys.exit(app.exec_())
测试:
$ python myGUI.py
这样,窗口弹出,button响应。

PART – II 剥离界面代码和功能代码
前述均是直接修改pyc导出的python界面代码文件。
但是一旦在qtcreator设计环境中修改了ui界面, 就要重新把ui界面文件重新pyc导出,
那么这个myGUI.py文件就被完全覆盖,修改的(功能)代码全部丢失。
所以, 不可以在python界面代码文件中写功能代码。
为此, 新建某个文件(myGUI.py同目录),例如main.py, 再文件中建立新类class, 例如myApp:
1. 建立新类
$ vi main.py
from PyQt4 import QtGui
import sys
# we Make one new class myApp that will combine with ui code
# so that we can use all of its features interact with GUI elements
import myGUI
# 子类调用一个自身没定义的属性的多重继承按照何种顺序到父类寻找? 尤其众多父类中有多个都包含该同名属性?
# 经典类采用, 从左到右深度优先原则匹配方法 ,新式类, 用C3算法(不同于广度优先)进行匹配
#继承方法搜索的路径是先从左到右,在选定一个Base之后一直沿着该Base的继承进行搜索直至最顶端然后再到另外一个Base。
# bujin完成了所有的父类的调用,而且保证了每一个父类的初始化函数只调用一次。
class myApp(QtGui.QMainWindow, myGUI.Ui_MainWindow):
def __init__(self):
# super(B, self)首先找到B的父类(类A),然后把类B的对象self转换为类A的对象
# 然后被转换的类A对象调用自己的__init__函数
#super机制可以保证公共父类仅被执行一次,执行顺序按照MRO:Method Resolution Order
# 混用super类和非绑定函数是危险行为
# Simple reason why we use it here is that it allows us to access variables and methods etc in myGUI.py,
# here the self.__class__ is B in above example code.
super(self.__class__, self).__init__()
# This is defined in myGUI.py file automatically. It sets up layout and widgets that are defined
self.setupUi(self)
def main():
app = QtGui.QApplication(sys.argv) # New instance of QApplication, same as myGUI.py
form = myApp() # We set the form to be our myApp (design)
form.show() # Show the form
app.exec_() # myGUI.py is sys.exit(app.exec_())
if __name__ == ‘__main__’: # if we’re running file directly and not importing it
main() # run the main function
以上即可操作界面,但是并没有响应界面元素。
2. 操作界面
例如,为pushButton01的clicked这个event建立一个connect:
self.pushButton01.clicked.connect(self.my_func01)
And add it to the __ini__ method of our myApp class so that it’s set up when the application starts.
实现事件的回调函数 my_func01 function:
def my_func01(self):
print “Hello…dehao…”
整体像这样:
$ vi main.py
from PyQt4 import QtGui
import sys
import myGUI
class myApp(QtGui.QMainWindow, myGUI.Ui_MainWindow):
def __init__(self, parent=None):
super(myApp, self).__init__(parent)
self.setupUi(self)
self.pushButton01.clicked.connect(self.my_func01)
def my_func01(self):
print “Hello…dehao…”
def main():
app = QtGui.QApplication(sys.argv)
form = myApp()
form.show()
app.exec_()
if __name__ == ‘__main__’:
main()
测试:
$ python main.py
… …
PART – III 剥离主线程和任务线程
以上,通过合理的组织,实现界面代码和功能代码的解耦。
但是:
全部功能均是在界面主线程进行,这对于某些耗时任务并不合适。
界面不更新、 不响应等界面冻结的体验恶劣,所以要把这类任务放在单独的线程。
通常, 界面处理所在线程为主线程, 执行具体工作的为任务线程。
1. QThread线程
1.1 建立一个工作线程像这样 :
from PyQt4.QtCore import QThread
class YourThreadName(QThread):
def __init__(self):
QThread.__init__(self)
def __del__(self):
self.wait()
def run(self):
# your logic here
注意不要直接用run这个method, 尽量通过start。
1.2 使用一个工作线程像这样:
self.myThread = YourThreadName()
self.myThread.start()
可以用类似 quit, start, terminate, isFinished, isRunning等method ,
QThread提供了finished, started, terminated等有用的signal。
2. 线程通讯
在后台背景运行的任务线程,需要把数据传给界面主线程,完成更新进度条之类。
The proper way to do communication between working threads and UI thread is using signals。
2.1 built-in signals
例如任务线程的暴力破解工作完成后, 界面可以得到消息并提示用户。
*-实现函数, 在界面主线程里实现响应函数:
def done(self):
QtGui.QMessageBox.information(self, “Done!”, “crack finish!”)
*-连接函数, 在界面主线程里连接信号和函数:
self.myThread = thread01(test)
self.connect(self.myThread, SIGNAL(“finished()”), self.done)
self.myThread.start()
总体上:
first make a new instance,
then connect the signal with function,
then start the thread.
查看所有可能的Qt Signals:
http://pyqt.sourceforge.net/Docs/PyQt4/qthread.html
2.2 custom signals
定制信号和内嵌信号的唯一区别,是要在“QThead类”里面定义信号,
至于界面主线程里面实现响应函数以及连接信号和响应函数的都是相同的。
*-定义信号, 在“QThead类”里面定义信号,有所种方法,例如这种:
self.emit(SIGNAL(‘myTask(QString)’), myParam)
*-连接函数, 在界面主线程里面捕捉信号,是和内嵌信号的处理相同:
self.connect(self.myThread, SIGNAL(“myTask(QString)”), self.myFunc00200)
NOTE! 但是要注意这里有个重要的定制信号和内嵌信号的不同点,就是这个信号会传递一个回调函数所需要的对象。
This signal will actually pass an object (in this case QString) to the myFunc00200 function, and we need to catch that.
If you do decide to pass something the function that will be connected to the signal must be able to accept that argument.
*-实现函数, 既然信号传递的是QString,那么myFunc00200的实现像这样:
def myFunc00200(self, text):
self.my_ui_list_controls.addItem(text)
self.my_ui_progress_bar.setValue(self.my_ui_progress_bar.value()+1)
界面主线程获得的text, 就是从任务线程传来的QString。
3. 一个例子
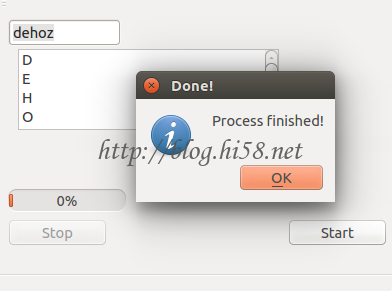
用户在界面输入字符串,经过耗时的暴力破解处理后,结果显示给界面,用户可以暂停,破解同时可以更新进度和结果。
为此布置界面元素如下:
输入: btn_Start,开始破解。 btn_Stop,取消破解。 edit_Control, 输入框。
显示: progress_Control,进度条。 list_Control, 列表框 破解结果。
注意列表选择 list_widget 不要用 list_view.
代码像这样:
$ vi main2.py
from PyQt4 import QtGui
from PyQt4.QtCore import QThread, SIGNAL
import sys
import myGUI2
import time
## … Threads code …
class thread01(QThread):
def __init__(self, text):
# Make a new thread instance with one text as the first argument.
# The text argument will be stored in an instance variable called text
# which then can be accessed by all other class instance functions
QThread.__init__(self)
self.text = text
def __del__(self):
self.wait()
def _get_upper_char(self, ch):
# simulate crack task by to up case
return ch.upper()
def run(self):
# simulate a time consuming by sleep
for ch in self.text:
c = self._get_upper_char(ch)
self.emit(SIGNAL(‘processing_char(QString)’), c)
self.sleep(2)
## … main code …
class myApp(QtGui.QMainWindow, myGUI2.Ui_MainWindow):
def __init__(self):
super(self.__class__, self).__init__()
self.setupUi(self)
self.btn_Start.clicked.connect(self.start_process)
def start_process(self):
text = str(self.edit_Control.text()).strip()
self.progress_Control.setMaximum( len( text ) )
self.progress_Control.setValue(0)
self.mythread = thread01(text)
self.connect(self.mythread, SIGNAL(“processing_char(QString)”), self.update_ui) #
self.connect(self.mythread, SIGNAL(“finished()”), self.done) #
self.mythread.start()
self.btn_Stop.setEnabled(True)
self.btn_Stop.clicked.connect(self.mythread.terminate)
self.btn_Start.setEnabled(False)
def update_char(self, text):
self.list_Control.addItem(text)
self.progress_Control.setValue(self.progress_Control.value()+1)
def done(self):
self.btn_Stop.setEnabled(False)
self.btn_Start.setEnabled(True)
self.progress_Control.setValue(0)
QtGui.QMessageBox.information(self, “Done!”, “process finished!”)
def main():
app = QtGui.QApplication(sys.argv)
form = myApp()
form.show()
app.exec_()
if __name__ == ‘__main__’:
main()
okay.
$ pyuic4 -x ./mainwindow.ui -o ./myGUI2.py
$ python main2.py


发表评论
Want to join the discussion?Feel free to contribute!