智能机器人(43):ROS视觉

7、视觉

7.1 首先测试,连接Kinect之后:
$ roslaunch openni_launch openni.launch
即可查看视频:
$ rosrun image_view image_view image:=/camera/rgb/image_color
7.2、自建测试包
$ cd ~/catkin_ws/src
$ catkin_create_pkg mysample_opencv sensor_msgs cv_bridge rospy std_msgs
$ catkin_make
okay.
$ mkdir ./scripts
$ mkdir ./launch
7.3、测试depth image
OpenCV2可以无缝链接到Python,先启动OpenNI驱动以获取点云图:
$ roslaunch openni_launch openni.launch
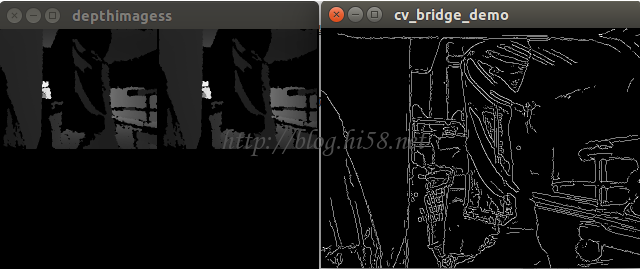
启动脚本:
$ python ~/catkin_ws/src/mysample_opencv/scripts/cv_bridge_demo.py
如图。

NOTE: 桥接poencv和ros-python的cv_bridge_demo.py脚本:
#!/usr/bin/env python
import rospy
import sys
import cv2
import cv2.cv as cv
from sensor_msgs.msg import Image, CameraInfo
from cv_bridge import CvBridge, CvBridgeError
import numpy as np
class cvBridgeDemo():
def __init__(self):
def image_callback(self, ros_image):
def depth_callback(self, ros_image):
def main(args):
try:
cvBridgeDemo()
rospy.spin()
except KeyboardInterrupt:
print “shutting down main”
cv.DestroyAllWindows()
if __name__ == ‘__main__’:
main(sys.argv)

7.3、测试point cloud
PCL支持OpenNI的3D接口,可以在Riz图形化。先启动OpenNI驱动以获取点云图:
$ roslaunch openni_launch openni.launch
然后可视化显示:
$ rosrun rviz rviz
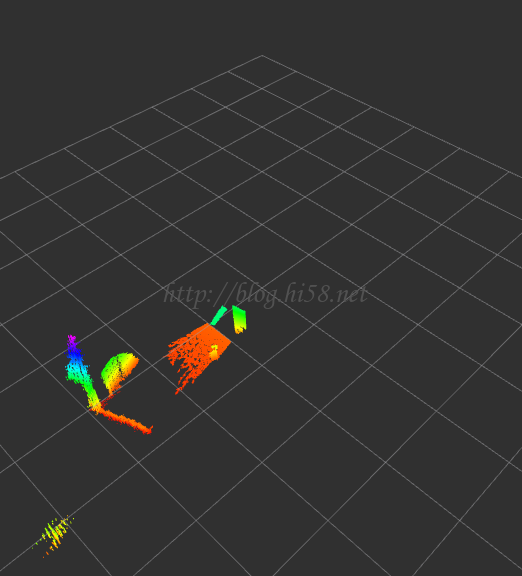
启动后把fixed frame设置为camera_link,添加一个PointCloud2显示选项,把topic设置为/camera/depth/points,即可看到点云图,再把ColorTransformer设置为AxisColor从而近处红色远处紫色蓝色,如图。

7.4、测试laser scan
先启动OpenNI驱动以获取点云图:
$ roslaunch openni_launch openni.launch
然后启动depthimage到laserscan的转换:
$ roslaunch mysample_openvc a.launch
最后可视化显示:
$ rosrun rviz rviz
启动后把fixed frame设置为camera_link,添加一个laserscan显示选项,把topic设置为/scan,即可看到激光扫描,图。
NOTE: 变换depthimage到laserscan的a.launch脚本:

args=”load depthimage_to_laserscan/DepthImageToLaserScanNodelet lasersc$

智能机器人(42):IP-camera

一、GStreamer
二、gst-launch
三、在linux环境使用ip-camera
四、在ros环境使用ip-camera

  • 一、GStreamer

GStreamer是个建立音视频管道的工具包,例如stream一个媒体文件到互联网,再例如把一个test.avi文件stream到一个V4L的camera。V4L的capture主要是用:
1–gst-launch-1.0 for capturing video
2–FFMpeg for saving and editing video
3–v4l-ctl for controlling your video card
4–mpv for viewing videos
5–gst-inspect for listing elements

  • 二、gst-launch

操作GStreamer主要用gst-launch这个CLI,这个命令行工具可以创建pipeline、初始化、然后运行,例如可以把一个avi媒体文件模拟成摄像头,把ip-camera回环成一个usb-camera,等等。
1–例如最简单的:
$ gst-launch-1.0 fakesrc ! fakesink
这样建立了一条simplest pipline,实现connects a single (fake) source to a single (fake) sink。
2–例如记录视频,create an AVI file with raw video and no audio:
$ gst-launch-1.0 v4l2src device=$VIDEO_DEVICE ! $VIDEO_CAPABILITIES ! avimux ! filesink location=test.avi
3–例如记录音频,create an AVI file with raw audio and no video:
$ gst-launch-1.0 $alsasrc device=$AUDIO_DEVICE ! $AUDIO_CAPABILITIES ! avimux ! filesink location=test.avi
4–记录音频和视频:
$ gst-launch-1.0 v4l2src device=$VIDEO_DEVICE ! $VIDEO_CAPABILITIES ! mux. alsasrc device=$AUDIO_DEVICE ! $AUDIO_CAPABILITIES ! mux. avimux name=mux ! filesink location=test-$.avi
This pipe has three parts:a video source leading to a named element (! name. with a full stop means “pipe to the name element”) an audio source leading to the same element a named muxer element leading to a file sink
5–把一个source分为多个out:
$ gst-launch-1.0 v4l2src device=$VIDEO_DEVICE ! $VIDEO_CAPABILITIES ! avimux ! tee name=network ! filesink location=test.avi tcpclientsink host=127.0.0.1 port=5678
This sends your stream to a file (filesink) and out over the network (tcpclientsink). To make this work, you’ll need another program listening on the specified port (e.g. nc -l 127.0.0.1 -p 5678).
6–从相机查看图片:
$ gst-launch-0.10 v4l2src do-timestamp=true device=$VIDEO_DEVICE ! video/x-raw-yuv,format=(fourcc)UYVY,width=320,height=240 ! ffmpegcolorspace ! autovideosink
7–其它选项
gst-launch -v –gst-debug-level=3,输出的调试信息会多一些。
IP camera, gstreamer and virtual video devices,指明画幅参数。

  • 三、linux环境使用IP相机

1、安装
1.1、包
$ sudo apt-get install v4l2loopback-dkms
1.2、源码
如果失败apt-get method may fail durning install. some wranings were treated as errors. Not sure if it’s a compiler compatibility issue.
$ sudo su
$ git clone https://github.com/umlaeute/v4l2loopback.git
$ cd v4l2loopback
$ make && make install
(是否需要sudo忘记了)
2、加载模块
2.1、加载
$ sudo modprobe v4l2loopback
2.2、如果提示not found
$ sudo depmod v4l2loopback
$ sudo modprobe v4l2loopback
2.3、如果还失败
$ sudo apt-get install linux-generic<——–maybe freeze you kernel
$ sudo apt-get install v4l2loopback-dkms
$ sudo depmod v4l2loopback
$ sudo modprobe v4l2loopback<——————
or
$ sudo modprobe v4l2loopback video_nr=7 3、验证
$ v4l2-ctl –list-devices
会出来虚拟设备,这里是video1,我原有的usb-camera是video0是。
Dummy video device (0x0000) (platform:v4l2loopback-000):
/dev/video*
同样也可以
$ dmesg v4l2loopback | grep v4l2
如果出现libv4l2: error getting pixformat: Invalid argument
or:
v4l2loopback: module verification failed: signature and/or required key missing – tainting kernel
美观它。

4、建立媒体源
the simpest is:
$ gst-launch v4l2src device=/dev/video0 ! v4l2sink device=/dev/video1
4.1、接收流媒体是:
$ gst-launch-0.10 udpsrc port=1234 ! theoradec ! ffmpegcolorspace ! ximagesink
发送流媒体是:
$ gst-launch-0.10 v4l2src ! ffmpegcolorspace ! theoraenc ! udpsink host=127.0.0.1 port=1234
注意先执行接收的。
4.2、显示或保存
显示视频:
$ gst-launch v4l2src ! xvimagesink
视频保存成文件:
$ gst-launch v4l2src ! video/x-raw-yuv,width=320,height=240 ! ffmpegcolorspace ! jpegenc ! avimux ! filesink location=osug-1.avi
4.3、某段音频伪装成相机video1:
$ gst-launch videotestsrc ! v4l2sink device=/dev/video1
查看下,ok:
$ cheese –device=/dev/video1
相机0伪装成相机1:
$ gst-launch v4l2src device=/dev/video0 ! v4l2sink device=/dev/video1
查看下,ok:
$ cheese –device=/dev/video1
文件伪装成相机1:
$ gst-launch filesrc location=”/home/zdh991/tmp/osug-1.avi” ! avidemux ! v4l2sink device=/dev/video1
查看下,ok:
$ cheese –device=/dev/video1
IP相机伪装成相机1:
$ gst-launch souphttpsrc location=http://192.168.1.126:80 ! jpegdec ! ffmpegcolorspace ! v4l2sink device=/dev/video1
查看下,ok:
$ cheese –device=/dev/video1

5、利用iphone模拟测试
IP camera, gstreamer, and virtual video devices.
如果没有IP-camera,可以使用iphone的摄像头。
安装一个app例如third eye,让iphone接入局域网分配。
在iphone获取到ip地址后,从pc上测试通过浏览器输入iphone-ipaddress:8091,如果可以实时显示iphone摄像头的视频,说明okay。

利用gat-launch操作iphone的这个ip:port把这个摄像头作为wifi的ip-camera来使用:
$ gst-launch souphttpsrc location=”http://172.20.10.11:8091″ ! jpegdec ! ffmpegcolorspace ! v4l2sink device=/dev/video1
这里面172.20.10.11:8091就是IP-camera的地址和端口。注意pc和iphone在同一subnet。

  • 四、ROS环境使用IP-camera

ros提供gscam这个node,可以用image view查看,例如:
$ gst-launch souphttpsrc location=http://[user]:[password]@[camera_ip]/mjpg/video.mjpg ! jpegdec ! v4l2sink device=/dev/video0
$ GSCAM_CONFIG=”rtspsrc location=rtsp://CameraIP/ipcam.sdp ! video/x-raw-rgb,framerate=30/1 ! ffmpegcolorspace”
$ rosrun image_view image_view image:=/gscam/image_raw
使用gscam也可以配合rosbridge的websocket,例如wss://ip:port。

  • A、gst-launch备忘

这个工具只能建立简单地pipeline。尤其是它只在特定层级之上模拟pipeline和应用的交互。可以很简单的快速测试pipeline。注意gst-launch主要是一个调试工具,真正用gst_parse_launch()这个API来创建pipeline。

gst-launch的命令行包括一个在PIPELINE-DESCRIPTION之后的一系列选项。简单说,一个PIPELINE-DESCRPTION是一系列用!分隔开的元素:
$ gst-launch-0.10 videotestsrc ! ffmpegcolorspace ! autovideosink
这用videotestsrc,ffmpegcolorspace和autovideosink三个element。GStreamer会把他们的输出pad和输入pad连接起来,如果存在超过1个可用的输入/输出pad,那么就用pad的Caps来确定兼容的pad。

element
element可能是有属性的,在命令行里格式就是“属性=值”,多个属性用空格来分开。可以用gst-inspect工具来查一下element的属性。
$ gst-launch-0.10 videotestsrc pattern=11 ! ffmpegcolorspace ! autovideosink
element可以用name这个属性来设置名称,这样一些复杂的包含分支的pipeline可以创建了。有了名字,就可以使用前面创建的element,这在使用有多个pad的element(比如demuxer或者tee等)时是必不可少的。
$ gst-launch-0.10 videotestsrc ! ffmpegcolorspace ! tee name=t ! queue ! autovideosink t. ! queue ! autovideosink
这把videotestsrc先连接了ffmpegcolorspace,然后连接了tee element 这个tee就被命名成‘t’,然后一路输出到queue以及autovideosink,另一路输出到另一个queue和autovideosink。

Pads
在连接两个element时与其让GStreamer来选择哪个Pad,宁可直接指定Pad。可以在命名element后使用.+pad名字的方法来做到这点(element必须先命名)。同样可以用gst-inspect来查看element里面pad的名字。
$ gst-launch-0.10.exe souphttpsrc location=http://docs.gstreamer.com/media/sintel_trailer-480p.webm ! matroskademux name=d d.video_00 ! matroskamux ! filesink location=sintel_video.mkv
这使用souphttpsrc在internet上锁定了一个媒体文件,这个文件是webm格式的。可以用matroskademux来打开这个文件,因为媒体包含音频和视频,所以创建了两个输出Pad,名字分别是video_00和audio_00。把video_00和matroskamux element连接起来,把视频流重新打包,最后连接到filesink,这样就把流存到了一个名叫intel_video.mkv的文件。总之找了一个webm文件,去掉了声音,仅把视频拿出来存成了一个新文件。如果保持声音,那么就应该这样:
$ gst-launch-0.10.exe souphttpsrc location=http://docs.gstreamer.com/media/sintel_trailer-480p.webm ! matroskademux name=d d.audio_00 ! vorbisparse ! matroskamux ! filesink location=sintel_audio.mka
这里的vorbisparse element会从流里面取出一些信息,然后放到Pad的Caps里面,这样下一个element,也就是matroskamux就可以知道如何处理这个流了。这个处理在抓取视频的时候是不用做的,因为matroskademux已经做了这件事情。
注意上面两个例子中媒体没有被解码和播放,仅仅只是把数据搬动了一下而已。

Caps过滤
当一个element有不止一个pad时,连接下一个element可能是模糊不清的,因为下游的element可能有不止一个的兼容的输入pad,或者它的输入pad可以和所有的输出pad兼容。在这样的情况下,GStreamer会使用第一个可以连接的Pad,这样相当于说GStreamer是随机找一个pad来连接的。
$ gst-launch-0.10 souphttpsrc location=http://docs.gstreamer.com/media/sintel_trailer-480p.webm ! matroskademux ! filesink location=test
这里和上一个例用了同样的媒体文件和demuxer。finksink输入pad是任意格式,这意味着它可以接受所有的媒体格式。那么matroskademux的哪个pad可以接到filesink呢?video_00还是audio_00?无法知道。为了消除这种不确定性,前面例子中用了pad的名字的方法,这里使用Caps过滤的方法:
$ gst-launch-0.10 souphttpsrc location=http://docs.gstreamer.com/media/sintel_trailer-480p.webm ! matroskademux ! video/x-vp8 ! matroskamux ! filesink location=sintel_video.mkv
一个Caps过滤动作类似于让element不做任何动作,仅仅接受给出的Caps。在这个例子中,在matroskademux和matroskamux中间加入了一个ievideo/x-vp8的Caps过滤,这样就表明在matroskademux中我们仅仅需要能生成这种类型视频的输出Pad。
需要用gst-inspect工具来查看一个element能接受和生成的Caps,用gst-discoverer来查看文件里面包含的Caps。如果需要查看在pipeline里面一个element生成的Caps,在gst-launch里面使用-v参数即可。
一个调整视频比例的pipeline。videoscale element可以调整输入尺寸然后再输出。例子里面用Caps过滤设置了视频大小为320×200:
$ gst-launch-0.10 uridecodebin uri=http://docs.gstreamer.com/media/sintel_trailer-480p.webm ! queue ! videoscale ! video/x-raw-yuv,width=320,height=200 ! ffmpegcolorspace ! autovideosink
智能机器人(41):USB-camera

一、camera的驱动
二、在linux种使用uvc驱动
三、在ros中使用uvc驱动
四、在ros中使用usb驱动

  • 一、camera的驱动

1、UVC
第一个概念是UVC:USB Video Device Class,大部分usb接口(包括主办集成)都兼容uvc,uvc的实现独立于linux/weindows等系统。
2、V4L
第二个概念是V4L或者V4L2:Video4Linux,它提供了一系列的API,新版本是2,V4L2。
3、usb_cam
ROS的usb_cam这个package实现了V4L,提供的node是usb_cam_node,发布的topic是<camera_name>/image,msg类型是sensor_msgs/Image ,参数主要有video_device,camera_name ,pixel_format ,camera_frame_id (The camera’s tf frame ),brightness。
4、uvc_camera
ROS的uvc_camera这个package实现了uvc视频流的用法,还支持两个相机组成的双目视觉,提供的node是UVC/USB camera,发布的topic主要有image_raw这个视频流,参数主要有device,fps,frame_id。该package已经不再维护,被libuvc_camera替代。
5、libuvc_camera
这个要求用户具有/dev/bus/usb/具体相机的写权限,所以最好:
$ sudo -E rosrun libuvc_camera camera_node vendor:=具体厂家
6、cv_camera
这个package是ROS提供的openCV驱动。

  • 二、在linux种使用uvc驱动

1、查看ID
$ lsusb
–Bus 001 Device 003: ID 1578:0076
–Bus 001 Device 004: ID 0547:4d35 Anchor Chips, Inc.
–Bus 001 Device 005: ID 04f2:b2ea Chicony Electronics Co., Ltd Integrated Camera [ThinkPad]
如果开发过usb设备的驱动程序,就很清楚04f2:b2ea是description里面的vendor和product,最常见的罗技c270是046d:0825,可以通过google这个ID,确定是否在uvc的支持列表。也可以在本机上运行:
$ lsusb -d 04f2:b2ea -v | grep “14 Video”
bFunctionClass         14 Video
bInterfaceClass        14 Video
这些输出信息说明兼容UVC,否则就是non-UVC camera。
2、看下设备
$ ls /dev | grep video
–video0
这说明有了硬件。
3、再看
$ lsmod | grep uvcvideo
uvcvideo               72275  0
videobuf2_core         39510  1 uvcvideo
videodev              108952  2 uvcvideo,videobuf2_core
videobuf2_vmalloc      13048  1 uvcvideo
4、如果没出现可以显式的加载模块
$ sudo modprobe uvcvideo
5、验证
$ lshal | grep video
system.hardware.primary_video.product = 1029  (0x405)  (int)
system.hardware.primary_video.vendor = 5549  (0x15ad)  (int)
info.linux.driver = ‘uvcvideo’  (string)
info.capabilities = {‘video4linux’, ‘video4linux.video_capture’} (string list)
info.category = ‘video4linux’  (string)
info.subsystem = ‘video4linux’  (string)
info.udi = ‘/org/freedesktop/Hal/devices/usb_device_4f2_b2ea_noserial_if0_video4linux’  (string)
linux.device_file = ‘/dev/video0’  (string)
linux.subsystem = ‘video4linux’  (string)
linux.sysfs_path = ‘/sys/devices/pci0000:00/0000:00:11.0/0000:02:03.0/usb1/1-2/1-2:1.0/video4linux/video0’  (string)
video4linux.device = ‘/dev/video0’  (string)
video4linux.version = ‘2’  (string)
$ lshal | grep Cam
info.product = ‘Integrated Camera [ThinkPad]’  (string)
usb_device.product = ‘Integrated Camera [ThinkPad]’  (string)
usb.interface.description = ‘Integrated Camera’  (string)
info.product = ‘Integrated Camera’  (string)
input.product = ‘Integrated Camera’  (string)
info.product = ‘5.0M USB2.0 Camera’  (string)
usb_device.product = ‘5.0M USB2.0 Camera’  (string)
6、说明ok的
$ dmesg | grep video
[  409.572621] Linux video capture interface: v2.00
[  409.663484] usbcore: registered new interface driver uvcvideo
[ 4822.404813] uvcvideo: Found UVC 1.00 device Integrated Camera (04f2:b2ea)
$ dmesg | grep Cam
[  168.027246] usb 1-1: Product: USB2-Camera
[  267.368271] usb 1-1: Product: USB2-Camera
[ 3700.024321] usb 1-1: Product: 5.0M USB2.0 Camera
[ 4822.259972] usb 1-2: Product: Integrated Camera
[ 4822.404813] uvcvideo: Found UVC 1.00 device Integrated Camera (04f2:b2ea)
[ 4822.530930] input: Integrated Camera as /devices/pci0000:00/0000:00:11.0/0000:02:03.0/usb1/1-2/1-2:1.0/input/input5
$ dmesg|tail -n20
7、开启视频
$ cheese –device=/dev/video0
这里用cheese查看视频。

  • 三、在ros中使用uvc驱动

1、安装uvc_cam
$ cd ~/catkin_ws
$ git clone https://github.com/ericperko/uvc_cam.git
$ cd ..
$ rosmake uvc_cam
这个,[uvc_cam] 的package位于用户的catkin_ws下面,所以要保证ROS_PACKAGE_PATH包含这个位置,可以roscd到uvc_cam。
当然,安装ros提供的也是可以的:
$ sudo apt-get install ros-hydro-uvc-camera
这样的话,[uvc_camera] 这个package就位于/opt的share下面了,关键的还是没法测试后续的rbx1的例程。
2、驱动测试
运行测试脚本
$ roslaunch  uvc_cam test_uvc.launch
查看视频
$ rosrun image_view image_view image:=/camera/image_raw
ok
3、进一步测试
3.1、借用下rbx1现成的launch脚本来运行[uvc_cam]驱动,(不是[uvc_camera])
$ roslaunch rbx1_vision  uvc_cam.launch  device:=/dev/video0
此时node增加了一个/uvc_cam_node,topic增加了许多。
3.2、或者使用[uvc_camera]而不用[uvc_cam]:
$ roslaunch rbx1_vision  uvc_camera.launch  device:=/dev/video0
同样的,node增加了一个/uvc_camera_node,topic增加了许多。
3.3、按照例程,后面还是使用 [uvc_cam] 。
3.4、查看视频:
利用vision_opencv这个package里面的image_view
$ rosrun image_view image_view image:=/camera/rgb/image_color
或者rqt里面plugins->imageview->选择/camera/rgb/image_color
$ rqt
ok

  • 四、在ros中使用usb驱动

1、安装usb_cam
$ cd ~/catkin_ws/src
$ git clone https://github.com/bosch-ros-pkg/usb_cam.git
$ cd ~/catkin_ws
$ catkin_make
或者:
$ cd ~
$ rosmake usb_cam
2、驱动测试
运行测试脚本
$ roslaunch usb_cam usb_cam-test.launch
在usb_cam的launch下面的usb_cam-test.launch这个脚本,把pixel_format设成了yuyv,有可能需要修改成mjpeg,然后保存。
也可以外部设置:
$ rosparam set /usb_cam/pixel_format yuyv
查看视频:
$ rosrun image_view image_view image:=/?????
3、为了进一步测试,写一个usb_cam.launch
$ cd ~/catkin_ws/src/rbx1/rbx1_vision/launch
仿照uvc_cam.launch的格式:
<launch>
<arg name=”device” default=”/dev/video0″ />
<node name=”uvc_cam_node” pkg=”uvc_cam” type=”uvc_cam_node” output=”screen”>
<remap from=”camera/image_raw” to=”camera/rgb/image_color” />
<param name=”device” value=”$(arg device)” />
<param name=”width” value=”320″ />
<param name=”height” value=”240″ />
<param name=”frame_rate” value=”20″ />
<param name=”exposure” value=”0″ />
<param name=”gain” value=”100″ />
</node>
</launch>
写成usb_cam.launch的脚本:
$ nano usb_cam.launch
<launch>
<arg name=”device” default=”/dev/video0″ />
<node name=”usb_cam_node” pkg=”usb_cam” type=”usb_cam_node” output=”screen”>
<remap from=”usb_cam_node/image_raw” to=”camera/rgb/image_color” />
<param name=”video_device” value=”$(arg device)” />
<param name=”image_width” value=”320″ />
<param name=”image_height” value=”240″ />
<param name=”framerate” value=”20″ />
<param name=”brightness” value=”128″ />
<param name=”contrast” value=”128″ />
<param name=”saturation ” value=”70″ />
</node>
</launch>
这里面为了使usb_cam和uvc_cam一样remap到camera/rgb/image_color,如果需要的话也加上修改图像格式这个:
<param name=”pixel_format ” value=”yuyv” />
4、进一步测试
运行驱动
$ roslaunch rbx1_vision  usb_cam.launch  device:=/dev/video0
查看视频
$ rosrun image_view image_view image:=/camera/rgb/image_color