1. 人脸检测 vs 人脸识别
2. 人脸识别的OpcnCV实现
3. 人脸识别的ROS实现
4. 基于RGBD-camera的人脸识别
后面所属人脸识别基于opencv,由cvbridge桥接到ros,先把张三李四的图片训练加入到数据库,然后由actionlib提供识别服务。
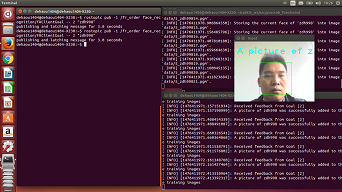
这是训练:
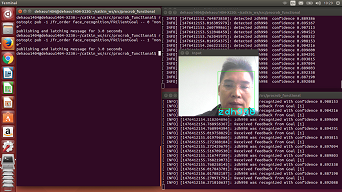
这是识别:
人脸检识别一般包括人脸检测和人脸识别两步:
1. 人脸检测 Face Detection, a photo is searched to find any face.
2. 人脸识别 Face Recognition, detected and processed face compared to a database of known faces to decide who that person is.
1. 人脸检测已经达到准确度90-95%,例如OpenCV’s Face Detector,麻烦点的是It is usually harder to detect a person’s face when they are viewed from the side or at an angle, and sometimes this requires 3D Head Pose Estimation. It can also be very difficult to detect a person’s face if the photo is not very bright, or if part of the face is brighter than another or has shadows or is blurry or wearing glasses, etc.
2. 但是人脸识别准确度就不乐观, However, Face Recognition is much less reliable than Face Detection, generally 30-70% accurate. Face Recognition has been a strong field of research since the 1990s, but is still far from reliable, and more techniques are being invented each year.
后面所属人脸识别用特征脸方法 Eigen faces,也称作主成分分析法 PCA:Principal Component Analysis,a simple and popular method of 2D FR。
1.1. 特征脸
特征向量源于概率分布的协方差矩阵。该协方差矩阵源于特征脸的集合。实现了降维。
Eigenfaces is the name given to a set of eigenvectors when they are used in the computer vision problem of human face recognition.
The approach of using eigenfaces for recognition was developed by Sirovich and Kirby (1987) and used by Matthew Turk and Alex Pentland in face classification.
The eigenvectors are derived from the covariance matrix of the probability distribution over the high-dimensional vector space of face images.
The eigenfaces themselves form a basis set of all images used to construct the covariance matrix.
This produces dimension reduction by allowing the smaller set of basis images to represent the original training images. Classification can be achieved by comparing how faces are represented by the basis set.
1.2. 原理
特征脸就是包含主成分的特征向量。
A set of eigenfaces can be generated by performing a mathematical process called principal component analysis (PCA) on a large set of images depicting different human faces.
Informally, eigenfaces can be considered a set of “standardized face ingredients”, derived from statistical analysis of many pictures of faces.
Any human face can be considered to be a combination of these standard faces. For example, one’s face might be composed of the average face plus 10% from eigenface 1, 55% from eigenface 2, and even -3% from eigenface 3.
1.3 实现
1.3.1. 先准备训练集。Prepare a training set of face images. The pictures constituting the training set should have been taken under the SAME lighting conditions, and must be NORMOLIZED to have the eyes and mouths aligned across all images. They must also be all resampled to a common pixel resolution (r × c). Each image is treated as one vector, simply by concatenating the rows of pixels in the original image, resulting in a single row with r × c elements. For this implementation, it is assumed that all images of the training set are stored in a single matrix T, where each column of the matrix is an image.
1.3.2. 减去均值矩阵,抛弃直流分量。Subtract the mean. The average image a has to be calculated and then subtracted from each original image in T.
1.3.3. 计算特征向量。Calculate the eigenvectors and eigenvalues of the covariance matrix S. Each eigenvector has the same dimensionality (number of components) as the original images, and thus can itself be seen as an image. The eigenvectors of this covariance matrix are therefore called eigenfaces. They are the directions in which the images differ from the mean image. Usually this will be a computationally expensive step (if at all possible), but the practical applicability of eigenfaces stems from the possibility to compute the eigenvectors of S efficiently, without ever computing S explicitly, as detailed below.
1.3.4. 通过阈值化获得主成分。Choose the principal components. Sort the eigenvalues in descending order and arrange eigenvectors accordingly. The number of principal components k is determined arbitrarily by setting a threshold ε on the total variance.
如此,即可。
These eigenfaces can now be used to represent both existing and new faces: we can project a new (mean-subtracted) image on the eigenfaces and thereby record how that new face differs from the mean face. The eigenvalues associated with each eigenface represent how much the images in the training set vary from the mean image in that direction.
2.1. detect a face with OpenCV’s Face Detector
opencv经典的是使用哈尔级联 The OpenCV library makes it fairly easy to detect a frontal face in an image using its Haar Cascade Face Detector
The function “cvHaarDetectObjects” in OpenCV performs the actual face detection, it is best to write a wrapper function:
// Perform face detection on the input image, using the given Haar Cascade.
// Returns a rectangle for the detected region in the given image.
CvRect detectFaceInImage(IplImage *inputImg, CvHaarClassifierCascade* cascade)
{
// Smallest face size.
CvSize minFeatureSize = cvSize(20, 20);
// Only search for 1 face.
int flags = CV_HAAR_FIND_BIGGEST_OBJECT | CV_HAAR_DO_ROUGH_SEARCH;
// How detailed should the search be.
float search_scale_factor = 1.1f;
IplImage *detectImg;
IplImage *greyImg = 0;
…
// Detect all the faces in the greyscale image.
t = (double)cvGetTickCount();
rects = cvHaarDetectObjects( detectImg, cascade, storage,
search_scale_factor, 3, flags, minFeatureSize);
t = (double)cvGetTickCount() – t;
ms = cvRound( t / ((double)cvGetTickFrequency() * 1000.0) );
nFaces = rects->total;
printf(“Face Detection took %d ms and found %d objectsn”, ms, nFaces);
// Get the first detected face (the biggest).
if (nFaces > 0)
rc = *(CvRect*)cvGetSeqElem( rects, 0 );
else
rc = cvRect(-1,-1,-1,-1); // Couldn’t find the face.
}
Now you can simply call “detectFaceInImage” whenever you want to find a face in an image.
2.2. specify the face classifier that OpenCV use to detect the face
分类器的方案 For example, OpenCV comes with several different classifiers for frontal face detection, as well as some profile faces (side view), eye detection, nose detection, mouth detection, whole body detection, etc. You can actually use this function with any of these other detectors if you want, or even create your own custom detector such as for car or person detection (read here), but since frontal face detection is the only one that is very reliable, it is the only one we discuss.
For frontal face detection, you can chose one of these Haar Cascade Classifiers that come with OpenCV (in the “datahaarcascades” folder):
“haarcascade_frontalface_default.xml”
“haarcascade_frontalface_alt.xml”
“haarcascade_frontalface_alt2.xml”
“haarcascade_frontalface_alt_tree.xml”
So you could do this in your program for face detection:
// Haar Cascade file, used for Face Detection.
char *faceCascadeFilename = “haarcascade_frontalface_alt.xml”;
// Load the HaarCascade classifier for face detection.
CvHaarClassifierCascade* faceCascade;
faceCascade = (CvHaarClassifierCascade*)cvLoad(faceCascadeFilename, 0, 0, 0);
if( !faceCascade ) {
printf(“Couldnt load Face detector ‘%s’n”, faceCascadeFilename);
exit(1);
}
…
Now that you have detected a face, you can use that face image for Face Recognition
2.3. 预处理preprocess images for Face Recognition
Now that you have detected a face, you can use that face image for Face Recognition. However, if you tried to simply perform face recognition directly on a normal photo image, you will probably get less than 10% accuracy!
It is extremely important to apply various image pre-processing techniques to standardize the images that you supply to a face recognition system. Most face recognition algorithms are extremely sensitive to lighting conditions, so that if it was trained to recognize a person when they are in a dark room, it probably wont recognize them in a bright room, etc. This problem is referred to as “lumination dependent”, and there are also many other issues, such as the face should also be in a very consistent position within the images (such as the eyes being in the same pixel coordinates), consistent size, rotation angle, hair and makeup, emotion (smiling, angry, etc), position of lights (to the left or above, etc). This is why it is so important to use a good image preprocessing filters before applying face recognition. You should also do things like removing the pixels around the face that aren’t used, such as with an elliptical mask to only show the inner face region, not the hair and image background, since they change more than the face does.
For simplicity, the face recognition system I will show you is Eigenfaces using greyscale images. So I will show you how to easily convert color images to greyscale (also called ‘grayscale’), and then easily apply Histogram Equalization as a very simple method of automatically standardizing the brightness and contrast of your facial images. For better results, you could use color face recognition (ideally with color histogram fitting in HSV or another color space instead of RGB), or apply more processing stages such as edge enhancement, contour detection, motion detection, etc. Also, this code is resizing images to a standard size, but this might change the aspect ratio of the face. You can read my tutorial HERE on how to resize an image while keeping its aspect ratio the same.
Here is some basic code to convert from a RGB or greyscale input image to a greyscale image, resize to a consistent dimension, then apply Histogram Equalization for consistent brightness and contrast:
// Either convert the image to greyscale, or use the existing greyscale image.
IplImage *imageGrey;
if (imageSrc->nChannels == 3) {
imageGrey = cvCreateImage( cvGetSize(imageSrc), IPL_DEPTH_8U, 1 );
// Convert from RGB (actually it is BGR) to Greyscale.
cvCvtColor( imageSrc, imageGrey, CV_BGR2GRAY );
}
else {
// Just use the input image, since it is already Greyscale.
imageGrey = imageSrc;
}
// Resize the image to be a consistent size, even if the aspect ratio changes.
IplImage *imageProcessed;
imageProcessed = cvCreateImage(cvSize(width, height), IPL_DEPTH_8U, 1);
// Make the image a fixed size.
// CV_INTER_CUBIC or CV_INTER_LINEAR is good for enlarging, and
// CV_INTER_AREA is good for shrinking / decimation, but bad at enlarging.
cvResize(imageGrey, imageProcessed, CV_INTER_LINEAR);
// Give the image a standard brightness and contrast.
cvEqualizeHist(imageProcessed, imageProcessed);
….. Use ‘imageProcessed’ for Face Recognition ….
if (imageGrey)
cvReleaseImage(&imageGrey);
if (imageProcessed)
cvReleaseImage(&imageProcessed);
Now that you have a pre-processed facial image
2.4. Eigenfaces be used for Face Recognition
Now that you have a pre-processed facial image, you can perform Eigenfaces (PCA) for Face Recognition. OpenCV comes with the function “cvEigenDecomposite()”, which performs the PCA operation, however you need a database (training set) of images for it to know how to recognize each of your people.
So you should collect a group of preprocessed facial images of each person you want to recognize. For example, if you want to recognize someone from a class of 10 students, then you could store 20 photos of each person, for a total of 200 preprocessed facial images of the same size (say 100×100 pixels).
Use “Principal Component Analysis” to convert all your 200 training images into a set of “Eigenfaces” that represent the main differences between the training images. First it will find the “average face image” of your images by getting the mean value of each pixel. Then the eigenfaces are calculated in comparison to this average face, where the first eigenface is the most dominant face differences, and the second eigenface is the second most dominant face differences, and so on, until you have about 50 eigenfaces that represent most of the differences in all the training set images.
In these example images above you can see the average face and the first and last eigenfaces that were generated from a collection of 30 images each of 4 people. Notice that the average face will show the smooth face structure of a generic person, the first few eigenfaces will show some dominant features of faces, and the last eigenfaces (eg: Eigenface 119) are mainly image noise. You can see the first 32 eigenfaces in the image below.
*** To explain Eigenfaces (Principal Component Analysis) in simple terms, Eigenfaces figures out the main differences between all the training images, and then how to represent each training image using a combination of those differences.
So for example, one of the training images might be made up of:
(averageFace) + (13.5% of eigenface0) – (34.3% of eigenface1) + (4.7% of eigenface2) + … + (0.0% of eigenface199).
Once it has figured this out, it can think of that training image as the 200 ratios:
{13.5, -34.3, 4.7, …, 0.0}.
It is indeed possible to generate the training image back from the 200 ratios by multiplying the ratios with the eigenface images, and adding the average face. But since many of the last eigenfaces will be image noise or wont contribute much to the image, this list of ratios can be reduced to just the most dominant ones, such as the first 30 numbers, without effecting the image quality much. So now it’s possible to represent all 200 training images using just 30 eigenface images, the average face image, and a list of 30 ratios for each of the 200 training images.
Interestingly, this means that we have found a way to compress the 200 images into just 31 images plus a bit of extra data, without loosing much image quality. But this tutorial is about face recognition, not image compression, so we will ignore that 🙂
o recognize a person in a new image, it can apply the same PCA calculations to find 200 ratios for representing the input image using the same 200 eigenfaces. And once again it can just keep the first 30 ratios and ignore the rest as they are less important. It can then search through its list of ratios for each of its 20 known people in its database, to see who has their top 30 ratios that are most similar to the 30 ratios for the input image. This is basically a method of checking which training image is most similar to the input image, out of the whole 200 training images that were supplied.
2.5. Implementing Offline Training
For implementation of offline training, where files are used as input and output through the command-line, I am using a similar method as the Face Recognition with Eigenface implementation in Servo Magazine, so you should read that article first, but I have made a few slight changes.
Basically, to create a facerec database from training images, you create a text file that lists the image files and which person each image file represents. For example, you could put this into a text file called “4_images_of_2_people.txt”:
1 Shervin dataShervinShervin1.bmp
1 Shervin dataShervinShervin2.bmp
1 Shervin dataShervinShervin3.bmp
1 Shervin dataShervinShervin4.bmp
2 Chandan dataChandanChandan1.bmp
2 Chandan dataChandanChandan2.bmp
2 Chandan dataChandanChandan3.bmp
2 Chandan dataChandanChandan4.bmp
This will tell the program that person 1 is named “Shervin”, and the 4 preprocessed facial photos of Shervin are in the “dataShervin” folder, and person 2 is called “Chandan” with 4 images in the “dataChandan” folder. The program can then loaded them all into an array of images using the function “loadFaceImgArray()”. Note that for simplicity, it doesn’t allow spaces or special characters in the person’s name, so you might want to enable this, or replace spaces in a person’s name with underscores (such as Shervin_Emami).
To create the database from these loaded images, you use OpenCV’s “cvCalcEigenObjects()” and “cvEigenDecomposite()” functions, eg:
// Tell PCA to quit when it has enough eigenfaces.
CvTermCriteria calcLimit = cvTermCriteria( CV_TERMCRIT_ITER, nEigens, 1);
// Compute average image, eigenvectors (eigenfaces) and eigenvalues (ratios).
cvCalcEigenObjects(nTrainFaces, (void*)faceImgArr, (void*)eigenVectArr,
CV_EIGOBJ_NO_CALLBACK, 0, 0, &calcLimit,
pAvgTrainImg, eigenValMat->data.fl);
// Normalize the matrix of eigenvalues.
cvNormalize(eigenValMat, eigenValMat, 1, 0, CV_L1, 0);
// Project each training image onto the PCA subspace.
CvMat projectedTrainFaceMat = cvCreateMat( nTrainFaces, nEigens, CV_32FC1 );
int offset = projectedTrainFaceMat->step / sizeof(float);
for(int i=0; i<nTrainFaces; i++) {
cvEigenDecomposite(faceImgArr[i], nEigens, eigenVectArr, 0, 0,
pAvgTrainImg, projectedTrainFaceMat->data.fl + i*offset);
}
You now have:
the average image “pAvgTrainImg”,
the array of eigenface images “eigenVectArr[]” (eg: 200 eigenfaces if you used nEigens=200 training images),
the matrix of eigenvalues (eigenface ratios) “projectedTrainFaceMat” of each training image.
These can now be stored into a file, which will be the face recognition database. The function “storeTrainingData()” in the code will store this data into the file “facedata.xml”, which can be reloaded anytime to recognize people that it has been trained for. There is also a function “storeEigenfaceImages()” in the code, to generate the images shown earlier, of the average face image to “out_averageImage.bmp” and eigenfaces to “out_eigenfaces.bmp”.
2.6 Implementing Offline Recognition
For implementation of the offline recognition stage, where the face recognition system will try to recognize who is the face in several photos from a list in a text file, I am also using an extension of the Face Recognition with Eigenface implementation in Servo Magazine.
The same sort of text file that is used for offline training can also be used for offline recognition. The text file lists the images that should be tested, as well as the correct person in that image. The program can then try to recognize who is in each photo, and check the correct value in the input file to see whether it was correct or not, for generating statistics of its own accuracy.
The implementation of the offline face recognition is almost the same as offline training:
The list of image files (preprocessed faces) and names are loaded into an array of images, from the text file that is now used for recognition testing (instead of training). This is performed in code by “loadFaceImgArray()”.
The average face, eigenfaces and eigenvalues (ratios) are loaded from the face recognition database file “facedata.xml”, by the function “loadTrainingData()”.
Each input image is projected onto the PCA subspace using the OpenCV function “cvEigenDecomposite()”, to see what ratio of eigenfaces is best for representing this input image.
But now that it has the eigenvalues (ratios of eigenface images) to represent the input image, it looks for the original training image that had the most similar ratios. This is done mathematically in the function “findNearestNeighbor()” using the “Euclidean Distance”, but basically it checks how similar the input image is to each training image, and finds the most similar one: the one with the least distance in Euclidean Space. As mentioned in the Servo Magazine article, you might get better results if you use the Mahalanobis space (define USE_MAHALANOBIS_DISTANCE in the code).
The distance between the input image and most similar training image is used to determine the “confidence” value, to be used as a guide of whether someone was actually recognized or not. A confidence of 1.0 would mean a good match, and a confidence of 0.0 or negative would mean a bad match. But beware that the confidence formula I use in the code is just an extremely basic confidence metric that isn’t reliable, so if you need something more reliable you should look for “Face Verification” algorithms. If you find that it gives misleading values for your images, you should ignore it or disable it in the code (eg: set the confidence always to 1.0).
Once it knows which training image is most similar to the input image, and assuming the confidence value is not too low (it should be atleast 0.6 or higher), then it has figured out who that person is, in other words, it has recognized that person!
2.7 mprove the Face Recognition accuracy
To improve the recognition performance, there are MANY things that can be improved here (look at commercial Face Recognition systems such as SPOTR for examples), and some improvements can be fairly easy to implement. For example, you could add color processing, edge detection, etc.
You can usually improve the face recognition accuracy by using more input images, atleast 50 per person, by taking more photos of each person, particularly from different angles and lighting conditions. If you cant take more photos, there are several simple techniques you could use to obtain more training images, by generating new images from your existing ones:
You could create mirror copies of your facial images, so that you will have twice as many training images and it wont have a bias towards left or right.
You could translate or resize or rotate your facial images slightly to produce many alternative images for training, so that it will be less sensitive to exact conditions.
You could add image noise to have more training images that improve the tolerance to noise.
Remember that it is important to have a lot of variation of conditions for each person, so that the classifier will be able to recognize the person in different lighting conditions and positions, instead of looking for specific conditions. But it’s also important to make sure that a set of images for a person is not too varied, such as if you rotated some images by 90 degrees. This would make the classifier to be too generic and also give very bad results, so if you think you will have a set of images with too much variance (such as rotation more than 20 degrees), then you could create separate sets of training images for each person. For example, you could train a classifier to recognize “John_Facing_Forward” and another one for “John_Facing_Left” and other ones “Mary_Facing_Forward”, “Mary_Facing_Left”, etc. Then each classifier can have a lot of variance but not too much, and you simply need to associate the different classifiers for each person with that one person (ie: “John” or “Mary”).
That’s why you can often get very bad results if you don’t use good preprocessing on your images. As I mentioned earlier, Histogram Equalization is a very basic image preprocessing method that can make things worse in some situations, so you will probably have to combine several different methods until you get decent results.
That’s why face recognition is relatively easy to do in realtime if you are training on someone and then instantly trying to recognize them after, since it will be the same camera, and background will be the same, their expressions will be almost the same, the lighting will be the same, and the direction you are viewing them from will be the same. So you will often get good recognition results at that moment. But once you try to recognize them from a different direction or from a different room or outside or on a different time of the day, it will often give bad results!
Alternative techniques to Eigenfaces for Face Recognition:
Something you should know is that Eigenfaces is considered the simplest method of accurate face recognition, but many other (much more complicated) methods or combinations of multiple methods are slightly more accurate. So if you have tried the hints above for improving your training database and preprocessing but you still need more accuracy, you will probably need to learn some more complicated methods, or for example you could figure out how to combine separate Eigenface models for the eyes, nose ; mouth.
3.1. 源代码安装face_recognition
$ cd ~/catkin_ws/src
$ git clone https://github.com/procrob/procrob_functional.git –branch catkin
$ cd ~/catkin_ws
$ catkin_make
$ source ~/catkin_ws/devel/setup.bash
3.2. 流程
训练图片: Training images are stored in the data directory.
训练图片列表: Training images are listed in the train.text file.
The ‘train.txt’ follows a specific format which is best understood by looking at the example train.txt file provided in the package. Note that person numbers start from 1, and spaces or special characters are not allowed in persons’ names.
The program trains from the training examples listed in the train.txt, and create an Eigenfaces database which is stored in the ‘facedata.xml’.
Face detection is performed using a haarcascade classifier ‘haarcascade_frontalface_alt.xml’. The ‘data’ folder and ‘train.txt’, ‘facedata.xml’ and ‘haarcascade_frontalface_alt.xml’ files should be placed in the program’s working directory (the directory from which you execute the program).
When the face_recognition program starts: 1) If facedata.xml exists, the Eigenfaces database is loaded from facedata.xml. 2) If facedata.xml does not exist, the program tries to train and create Eigenfaces database from the training images listed in train.txt. Regardless of if the Eigenfaces database is loaded/created at start up or not, you can always add training images directly from the video stream and then update the Eigenfaces database by (re)training. Note: when the program (re)trains, the content of facedata.xml is disregarded and the program trains only based on the training images listed in train.txt.
3.3. 示例
For demonstration purposes an actionlib client example for the face_recognition simple actionlib server has been provided
The client subscribes to face_recognition/FRClientGoal messages. Each FRClientGoal message contains an ‘order_id’ and an ‘order_argument’ which specify a goal to be executed by the face_recognition server.
After receiving a message, the client sends the corresponding goal to the server. By registering relevant call back functions, the client receives feedback and result information from the execution of goals in the server and prints such information on the terminal.
3.3.1 发布视频流到主题/camera/image_raw.
For example you can use usb_cam to publish images from your web cam ,这个launch需要自己写:
$ roslaunch usb_cam usb_cam-zdh.launch
now add one node: /usb_cam_node and several topics.
can check it:
$ rosrun image_view image_view image:=/camera/image_raw.
可能需要安装驱动:
$ sudo apt-get install ros-indigo-usb-cam
3.3.2 启动Fserver
Fserver is a ROS node that provides a simple actionlib server interface for performing different face recognition functionalities in video stream.
Start the Fserver node:
$ cd /home/dehaou1404/catkin_ws/src/procrob_functional
$ rosrun face_recognition Fserver
* THE server subscribed topic:
— /camera/image_raw – video stream (standard ROS image transport)
* THE server involve parameters:
confidence_value (double, default = 0.88)
— add_face_number (int, default = 25)
3.3.3 启动FClient
Fclient is a ROS node that implements an actionlib client example for the face_recognition simple actionlib server (i.e. ‘Fserver’). ‘Fclient’ is provided for demonstration and testing purposes.
Each FRClientGoal message has an ‘order_id’ and an ‘order_argument’, which specify a goal to be executed by the Fserver.
After receiving a message, Fclient sends the corresponding goal to the Fserver. By registering relevant call back functions, Fclient receives feedback and result information from the execution of goals in the Fserver and prints such information on its terminal.
Run the face recognition client:
$ cd /home/dehaou1404/catkin_ws/src/procrob_functional
$ rosrun face_recognition Fclient
* THE client subscribe the topic:
— fr_order (face_recognition/FRClientGoal)
3.3.4. 训练和识别
Publish messages on topic /fr_order, to test different face recognition functionalities.
NOTICE: notice the info printed from client terminal after each command
3.3.4.1. 采集训练图片。
Acquire training images for one face, notice this one should try to appear in the video stream.
$ rostopic pub -1 /fr_order face_recognition/FRClientGoal — 2 “dehaoZhang”
in the server…:
[ INFO] [1483429069.013208800]: No face was detected in the last frame
[ INFO] [1483429069.266604135]: No face was detected in the last frame
[ INFO] [1483429069.512622293]: No face was detected in the last frame
[ INFO] [1483429069.728653884]: Storing the current face of ‘dehaoZhang’ into image ‘data/6_dehaoZhang1.pgm’.
[ INFO] [1483429075.494751180]: Storing the current face of ‘dehaoZhang’ into image ‘data/6_dehaoZhang24.pgm’.
[ INFO] [1483429075.745061728]: Storing the current face of ‘dehaoZhang’ into image ‘data/6_dehaoZhang25.pgm’.
in the client…:
[ INFO] [1483429043.355890495]: request for sending goal [2] is received
[ INFO] [1483429043.356973474]: Goal just went active
[ INFO] [1483429069.732158190]: Received feedback from Goal [2]
[ INFO] [1483429069.732210837]: A picture of dehaoZhang was successfully added to the training images
[ INFO] [1483429069.980983035]: Received feedback from Goal [2]
[ INFO] [1483429069.981020038]: A picture of dehaoZhang was successfully added to the training images
[ INFO] [1483429075.496298334]: Received feedback from Goal [2]
[ INFO] [1483429075.496374189]: A picture of dehaoZhang was successfully added to the training images
[ INFO] [1483429075.746450499]: Goal [2] Finished in state [SUCCEEDED]
[ INFO] [1483429075.746538156]: Pictures of dehaoZhang were successfully added to the training images
3.3.4.2. 训练样本集。
Retrain and update the database, so that you can be recognized
$ rostopic pub -1 /fr_order face_recognition/FRClientGoal — 3 “none”
in server…:
[ INFO] [1483429419.101123133]: People:
[ INFO] [1483429419.101157041]:
[ INFO] [1483429419.101187136]: ,
[ INFO] [1483429419.101213218]: ,
[ INFO] [1483429419.101241996]: ,
[ INFO] [1483429419.101268921]: ,
[ INFO] [1483429419.101300335]: ,
[ INFO] [1483429419.101334005]: .
[ INFO] [1483429419.101375442]: Got 150 training images.
in client…:
[[5~[ INFO] [1483429418.947685612]: request for sending goal [3] is received
[ INFO] [1483429418.948517146]: Goal just went active
[ INFO] [1483429421.776359616]: Goal [3] Finished in state [SUCCEEDED]
3.3.4.3. 识别
Recognize faces continuously. This would not stop until you preempt or cancel the goal. So lets preempt it by sending the next goal.
$ rostopic pub -1 /fr_order face_recognition/FRClientGoal — 1 “none”
3.3.4.4. 退出
$ rostopic pub -1 /fr_order face_recognition/FRClientGoal — 4 “none”
3.4. 参数和消息 Param and message
This message includes 2 fields:
— int order_id
— string order_argument
The FaceRecognitionGoal message has 2 fields: ‘order_id’ is an integer specifying a goal, ‘order_argument’ is a string used to specify an argument for the goal if necessary:
order_id = 2, then order_argument = person_name, =(Add face images)
Goal is to acquire training images for a NEW person. The video stream is processed for detecting a face which is saved and used as a training image for the new person. This process is continued until the desired number of training images for the new person is acquired. The name of the new person is provided as “order_argument”
order_id = 3, without args, =(Train)
The database is (re)trained from the training images
order_id = 0, without, =(Recognize Once)
Goal is to acknowledge the first face recognized in the video stream. When the first face is recognized with a confidence value higher than the desirable confidence threshold, the name of the person and the confidence value are sent back to the client as result.
order_id = 1, without, =(Recognize Continuously)
Goal is to continuously recognize faces in the video stream. Every face recognized with confidence value higher than the desirable confidence threshold and its confidence value are sent back to the client as feedback. This goal is persuaded for infinite time until it is canceled or preempted by another goal.
order_id = 4, without, =(Exit)
The program exits.
这个是RGBD相机,不同于常用webcam,增加了深度信息。
This package contains software for detecting heads and faces and recognizing people. Head and face detection utilize the Viola-Jones classifier on depth or color images, respectively. Face recognition of previously learned people is based on either Eigenfaces or Fisherfaces. The recognition method can be configured and trained with a simple interface as explained in the next section.
4.1. 安装cob_people_perception
$ roscd
$ cd ../src
$ git clone https://github.com/ipa-rmb/cob_people_perception.git
$ git clone https://github.com/ipa-rmb/cob_perception_common.git
$ cd ..
$ source ./devel/setup.bash
$ rosdep install –from-path src/ -y -i
$ catkin_make -DCMAKE_BUILD_TYPE=”Release”
4.2. 流程
Then install Openni (http://wiki.ros.org/openni_launch) and start the Openni driver (old Kinect, Asus) with
$ roslaunch openni_launch openni.launch
or the Openni2 driver (new Asus, http://wiki.ros.org/openni2_launch) with
$ roslaunch openni2_launch openni2.launch
or any other driver according to your used sensor.
When using the openni or openni2 driver, please ensure that depth_registration is activated (e.g. by using rosrun rqt_reconfigure rqt_reconfigure). Also check that the camera_namespace argument and the camera topics colorimage_in_topic and pointcloud_rgb_in_topic, which are set in the ros/launch/people_detection.launch file, correspond to the topic names of your camera driver.
4.3. 示例
4.3.1 Then launch people detection
$ roslaunch cob_people_detection people_detection.launch
or with
$ roslaunch cob_people_detection people_detection.launch using_nodelets:=true
The second version uses nodelets for the first stages of data processing which might yield a substantially better runtime if your processor is fast enough on single core usage.
Now a window should pop up and present you with the current image of the camera. Heads will be framed with a light blue rectangle and detected faces are indicated in light green. For your convenience, the package contains a client for easy usage of people detection. Start the client with
$ rosrun cob_people_detection people_detection_client
4.3.2 functions
No identification data will be available the first time you start the people detection node on your computer. To record some data adjust the frame rate of the camera, first, by choosing 5 – activate/deactivate sensor message gateway in the client and then enter 1 to activate the sensor message gateway. The frame rate should be chosen somewhere between 5 and 30 Hz depending on your computer’s power.
Choose an option:
1 – capture face images
2 – update database labels
3 – delete database entries
4 – load recognition model (necessary if new images/persons were added to the database)
>> 5 – activate/deactivate sensor message gateway <<
6 – get detections
q – Quit
Type 1 to activate or 2 to deactivate the sensor message gateway: 1
At which target frame rate (Hz) shall the sensor message gateway operate: 20
Gateway successfully opened.
Now select 1 – capture face images from the menu of the client and enter the name of the first person to capture. Please do not use any whitespaces in the name. Following, you are asked to select how to record the data: manually by pressing a button or automatically. In the manual mode, you have to press c each time an image shall be captured and q to finish recording. Make sure that only one person is in the image during recording, otherwise no data will be accepted because the matching between face and label would be ambiguous.
Choose an option:
>> 1 – capture face images <<
2 – update database labels
3 – delete database entries
4 – load recognition model (necessary if new images/persons were added to the database)
5 – activate/deactivate sensor message gateway
6 – get detections
q – Quit
Input the label of the captured person: ChuckNorris
Mode of data capture: 0=manual, 1=continuous: 0
Recording job was sent to the server …
Waiting for the capture service to become available …
[ INFO] [1345100028.962812337]: waitForService: Service [/cob_people_detection/face_capture/capture_image] has not been advertised, waiting…
[ INFO] [1345100028.985320699]: waitForService: Service [/cob_people_detection/face_capture/capture_image] is now available.
Hit ‘q’ key to quit or ‘c’ key to capture an image.
Image capture initiated …
image 1 successfully captured.
Image capture initiated …
image 2 successfully captured.
Image capture initiated …
image 3 successfully captured.
Image capture initiated …
image 4 successfully captured.
Finishing recording …
Data recording finished successfully.
Current State: SUCCEEDED Message: Manual capture finished successfully.
If you are using one of the more modern recognition methods (choices 2=LDA2D or 3=PCA2D, can be set in file cob_people_detection/ros/launch/face_recognizer_params.yaml as parameter recognition_method) then please be aware that they require at least two different people in the training data. The next step, building a recognition model, will not start with only one person available with these algorithms. If you quit the program before recording a second person, the program might not start anymore. Then please delete all data from ~/.ros/cob_people_detection/files/training_data, start the program and record two people.
After training, you need to build a recognition model with the new data. To do so, just select 4 – load recognition model from the client’s menu. In the following prompt you can either list all persons that you captured and that shall be recognized by the system, e.g. by typing
Choose an option:
1 – capture face images
2 – update database labels
3 – delete database entries
>> 4 – load recognition model (necessary if new images/persons were added to
>> the database) <<
5 – activate/deactivate sensor message gateway
6 – get detections
q – Quit
Enter the labels that should occur in the recognition model. By sending an empty list, all available data will be used.
Enter label (finish by entering ‘q’): ChuckNorris
Enter label (finish by entering ‘q’): OlliKahn
Enter label (finish by entering ‘q’): q
Recognition model is loaded by the server …
A new recognition model is currently loaded or generated by the server. The following labels will be covered:
– ChuckNorris
– OlliKahn
The new recognition model has been successfully loaded.
Current State: SUCCEEDED Message: Model successfully loaded.
or you can directly enter q and all available persons will be trained.
After all steps succeeded, you can watch the recognition results in the display. Although you may access all training data functions (update, delete, etc.) from the client directly you may also access the files directly, which are located in your home folder at ~/.ros/cob_people_detection/files/training_data.
